What's in Part 2?
After the configuration of the Host VM hypervisor (part 1), we will get the following components configured:
- Windows 2016 with nested Hyper-V, Containers and WSL roles
- Docker daemon installed (no SSL)
- Docker daemon configured with SSL
Setup: Windows 2016 Server
this one will be longer, even if I will only list the commands and reference the guides I followed to have my Docker host configured inside the Hyper-V VM. Which means it will not contain any output and, more importantly, I won't put the explanations that the guides provide.I strongly recommend that you click on the "source" links and look at their great content.
Also, I won't explain how to install the OS, just note that you should choose the Windows 2016 Server 1709 version (I picked the Standard version).
Adding the roles
- Add Hyper-V and the Containers roles
PS> Enable-WindowsOptionalFeature -Online -FeatureName containers -All -NoRestart

PS> Enable-WindowsOptionalFeature -Online -FeatureName Microsoft-Hyper-V -All -NoRestart- Add WSL role with Ubuntu as default distribution (source)
PS> Enable-WindowsOptionalFeature -Online -FeatureName Microsoft-Windows-Subsystem-Linux

PS> Invoke-WebRequest -Uri https://aka.ms/wsl-ubuntu-1604 -OutFile ~/Ubuntu.zip -UseBasicParsing

PS> mkdir c:\distros

PS> Expand-Archive ~/Ubuntu.zip c:\distros\Ubuntu

PS> [System.Environment]::SetEnvironmentVariable("Path", $env:Path + ";c:\distros\ubuntu", [System.EnvironmentVariableTarget]::Machine)
Docker daemon install
- Follow @StefanScherer guide to install the Docker daemon (source)
PS> Invoke-WebRequest -OutFile "$env:TEMP\linuxkit-lcow.zip" "https://23-111085629-gh.circle-artifacts.com/0/release.zip"

PS> Expand-Archive -Path "$env:TEMP\linuxkit-lcow.zip" -DestinationPath "$env:ProgramFiles\Linux Containers" -Force

PS> Invoke-WebRequest -OutFile "$env:TEMP\docker-master.zip" "https://master.dockerproject.com/windows/x86_64/docker.zip"

PS> Expand-Archive -Path "$env:TEMP\docker-master.zip" -DestinationPath $env:ProgramFiles -Force

PS> . $env:ProgramFiles\docker\dockerd.exe --register-service --experimental- You can reboot the VM now.
Securing the Docker daemon
- After the reboot, now comes the fun part, enter a WSL session and generate the SSL certificates for the Docker TLS connection (source)
PS> ubuntu.exe

bash:~$ cd /mnt/c/Program\ Files/docker && mkdir certs && cd certs

bash:certs$ export HOST=`hostname`

bash:certs$ export NAT_IP=`hostname -I | cut -f1 -d' '`

bash:certs$ openssl genrsa -aes256 -out ca-key.pem 4096

bash:certs$ openssl req -new -x509 -days 365 -key ca-key.pem -sha256 -out ca.pem

bash:certs$ openssl req -subj "/CN=$HOST" -sha256 -new -key server-key.pem -out server.csr

bash:certs$ echo subjectAltName = DNS:$HOST,IP:$NAT_IP,IP:127.0.0.1 >> extfile.cnf

bash:certs$ echo extendedKeyUsage = serverAuth >> extfile.cnf

bash:certs$ openssl x509 -req -days 365 -sha256 -in server.csr -CA ca.pem -CAkey ca-key.pem -CAcreateserial -out server-cert.pem -extfile extfile.cnf

bash:certs$ chmod -v 0400 ca-key.pem server-key.pem

bash:certs$ chmod -v 0444 ca.pem server-cert.pem- Continuing in WSL (because we can and love VI), create the Docker config file
bash:certs$ cd /mnt/c/ProgramData/docker/config/ && vi daemon.json
{
        "hosts": ["tcp://0.0.0.0:2376","npipe://"],
        "tlsverify": true,
        "tlscacert": "c:\\Program Files\\docker\\certs\\ca.pem",
        "tlscert": "c:\\Program Files\\docker\\certs\\server-cert.pem",
        "tlskey": "c:\\Program Files\\docker\\certs\\server-key.pem"
}
:wq!
- Finally, exit WSL shell to Powershell again and restart the Docker service
bash:config$ exit

PS> Restart-Service docker

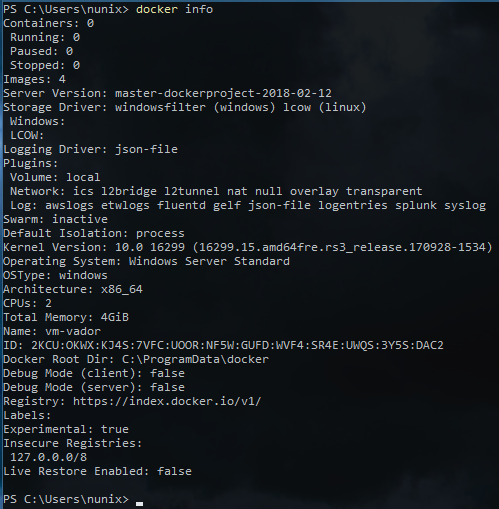
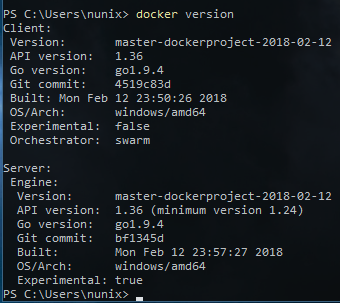
PS> Get-Service docker- Your install should look something like this


Your Docker daemon is now ready to accept TLS connections and, thanks to the "npipe://" connection, you can also already use it on your Server.
I know this part was the "heavy" one and if you are reading these lines, then I truly thank you and please contact me on Twitter (@nunixtech) for any remark on this guide or even better, if you spot a typo or something really wrong (hopefull not, right).
This is the end of the Part 2. I will publish the part 3, Client configuration, in the next coming days.
>>> Nunix Out <<<

Comments
Post a Comment